There are many project management tools out there – so many, in fact, they may even outnumber the potential projects in which they could be used.
We’ve spent a decent amount of time testing everything from Asana and Jira to Pivotal Tracker, but we always come back to Trello.
Most project management systems provide a lot of really nice and useful features: burndown charts, burnup charts, epics, advanced filters, estimation aid etc, but Trello excels at one thing: it is simple.
Simplicity is important to us for a number of reasons:
- We work very closely with our customers and Trello allows non-technical users to jump in and start collaborating without having to spend time learning a complicated user interface.
- The clutter-free experience makes it very easy to operate and to digest information at a glance.
- Not having a ton of features also keeps us from spending too much time fiddling with settings and stuff, and allows us to focus on what’s essential.
- Trello is, by virtue of its lack of features, so flexible that it allows both us and our customers to use a single tool to manage any aspect of projects, businesses, and private lives.
In this post we’ll describe how we use the different components in Trello to support our process.
Boards
One board per project is usually enough, but it is of course possible to divide a larger project into several boards (e.g. one board per milestone, version, subsystem, or goal). Using multiple boards works well as cards can be moved between boards.
We also, sometimes, use multiple boards to keep the project management board as clean as possible. We’ve been known to have “Sandbox” or “Planning” boards where we keep things that do not fit in or are not mature enough to move into the “Project” board.
Lists
There are many different ways to organize a board. We usually start with the following lists in a standard project management situation:
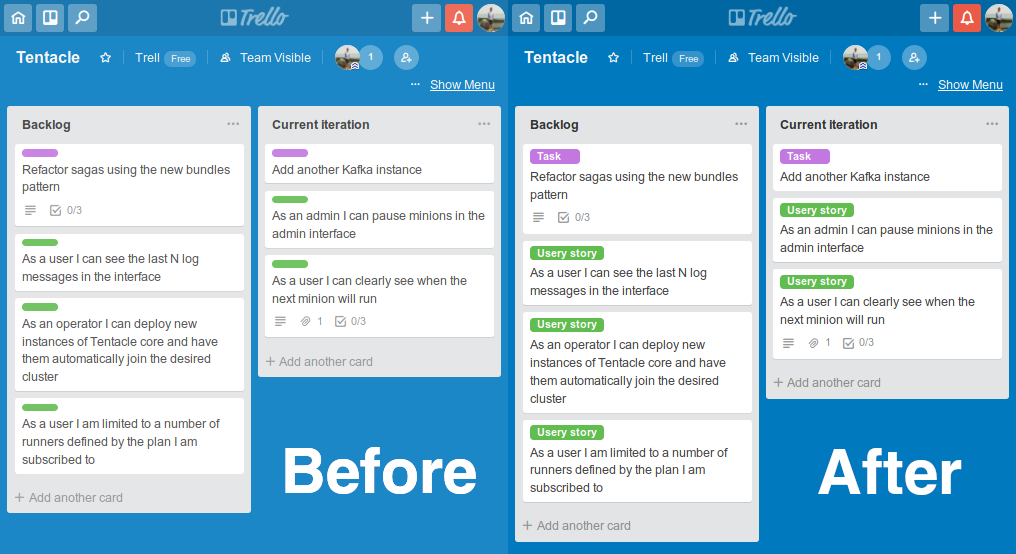
- Backlog
A list of cards ordered by priority from top to bottom (most important/urgent at the top). - Current iteration
Work that is going to be finished in the current iteration. - In progress
Cards that are actively being worked on. - Ready for testing
Work that has been finished and deployed to a staging environment. - Done [iteration number/week]
Cards that have passed testing and are considered done. We sequence the done-lists to keep track of which iteration they belonged to. After an iteration has been completed the list is moved to the farthest right (so we can admire the progress). - Blocked
Work that cannot be started or completed for some reason (described as a comment).
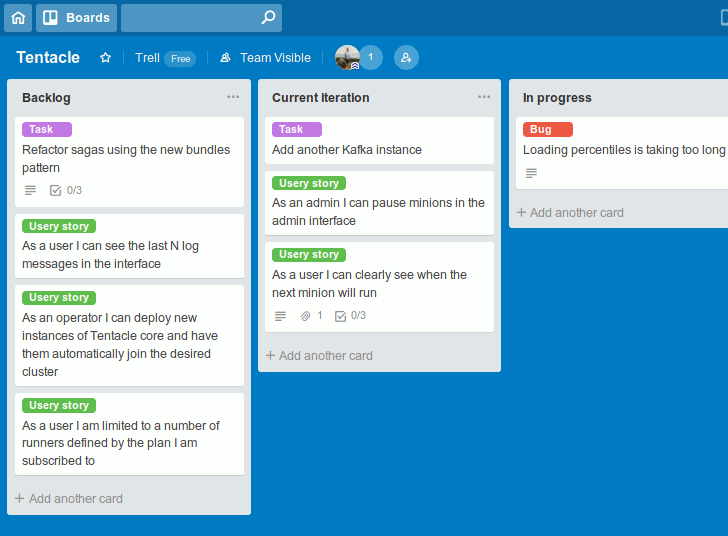
A typical card moves from the “Backlog” into the “Current iteration”, then it is moved to “In progress” by the developer/pair that is going to work on the card. It is then assigned to or claimed by the developer(s) and stays in the list while being worked on.
When done, the card is moved to “Ready for testing”. From there it is either moved back into “In progress” if the card needs more work, or is moved into “Done”.
Once the iteration has been completed, and everything has been deployed, the “Done” list is archived and a new list is created in its place. Cards can be moved into the “Blocked” list at any given time.
Additional lists
The lists above are sufficient for the majority of our projects, but we adapt our boards slightly for each project. The following lists are among the most frequently used:
- Next iteration
Enables us to start planning the next iteration before the current iteration has been completed. - Iteration [N]
For some projects we plan ahead and create most/all iterations beforehand, leaving a little room in each for unexpected work. - Ready for review
Makes it very explicit that the work is ready for review, albeit PRs usually work just fine. - Ready for testing/QA/QC
The work has been deployed to the staging environment and is ready for testing, QA, and/or QC. - Tested/Ready
We often go from “Ready for testing” directly to “Done” and deploy to production after each iteration, but in some projects we deploy small units of work as they are completed and use an intermediary list to keep track of things that are ok to put in production. - Resources
Assets and other resources that may be useful during the project. - Ideas/Sandbox
A place to put things that cannot be prioritized but shouldn’t be forgotten.
We have created a public template board that you can copy and use as a foundation for your next project.
Cards
We primarily use five different types of cards: “User story”, “Task”, “Bug”, “Discussion”, and “Planning”. Labels are applied to indicate the type of the card (see next section).
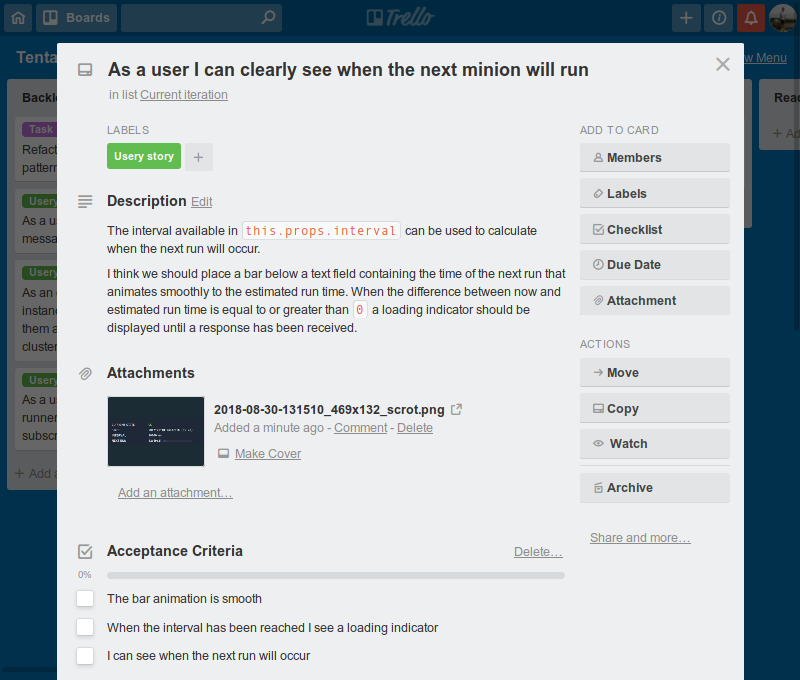
User story
The actual user story is written in the title of the card. The description is used to outline an implementation plan or add any other “sticky” context. We make heavy use of the Markdown capabilities of Trello to make the information structured and easy to digest. Checklists are used for acceptance criteria and to keep track of progress in case of multiple steps (this is quite rare as we try to keep the stories small).
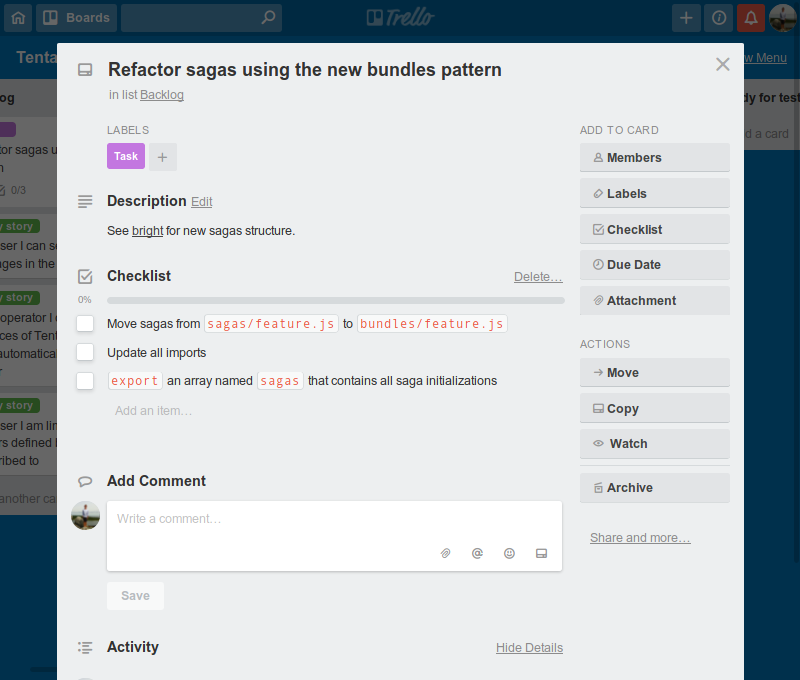
Task
Tasks are similar to User stories in that we use the title and description for the task summary and details. Checklists can be used to divide the task into several steps.
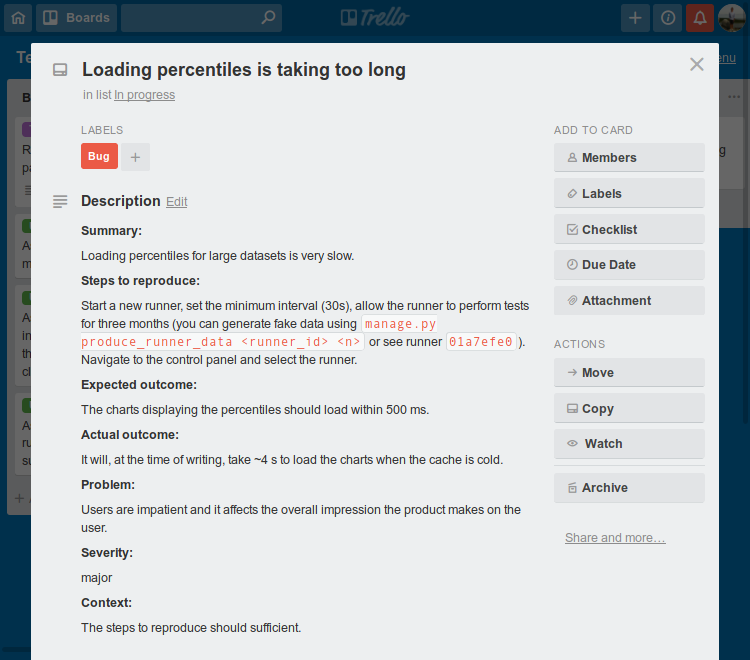
Bug
Bugs are yet again similar; we write a descriptive title that explains the problem and use the description to describe the bug using the following template:
**Summary:**

**Steps to reproduce:**

**Expected outcome:**

**Actual outcome:**

**Problem:**

**Severity:**

**Context:**
Screenshots and other resources can be added to the card as attachments.
The bugs are put in the backlog and will be prioritized as normal cards. Urgent bugs may be moved to the top of the current iteration where a developer or pair will claim the card and fix the problem immediately.
Labels
We use labels quite sparingly to reduce visual clutter and make the labels that we do use stand out. During normal circumstances we use the following standard labels:
- User story (green)
- Task (purple)
- Bug (red)
- Planning (yellow)
- Discussion (orange)
The other colors are used to keep track of what subsystem or feature a particular card belongs to.
When specific features or subsystems that are larger in scope are planned it is often nice to create a ephemeral list for that particular set of cards. Doing so allows you to get an overview of the subsystem in isolation. Once all of the cards have been created you can apply a descriptive label to the cards in the list (e.g. the name of the feature or subsystem), sort the cards into the backlog, and delete the list.
Note: There’s a “hidden” feature in Trello that makes working with labels a lot more pleasant. When you see a card with a label, click on the small colored bar that represents the label. All labels should then be expanded and the text associated with the label is displayed wherever you see labels. You can also use the ; keyboard shortcut when you’re in the board overview for the same effect. This setting is account-wide, not board-wide, so all members have to perform this step individually.
Keyboard shortcuts
The keyboard shortcuts in Trello can have a significant impact on your experience. You can see a list of all shortcuts here. You can also get a list of available with the keyboard shortcut ? in the board overview. Our most frequently used shortcuts are the following:
- Hover a card and press
Nto create a card below the currently hovered card. - Hover a card and press
Ato assign someone to that card. You can also usespaceto assign yourself to the card immediately. - Hover a card and press
Lto open the labels menu. - Hover a card and press
0 - 9to quickly select labels by color group (it’s awesome).
Power-ups
We typically try to stay away from extending Trello as we want to keep it as simple as possible. Having that said, there are a couple of Power-ups that are really useful.
Custom fields
The Custom fields power-up allows you to add customized fields to your cards. This can be immensely useful if you want additional meta data (such as estimates) to be visible in the board overview, or if you want some data to be structured and validated on input (severity levels for example).
Calendar
We do not have to worry about due dates under normal circumstances, but when we do have projects that require them we use the Calendar Power-up to bring perspective to the timeline.
Butler
You can use Butler to automate repetitive tasks. You can, for example, use Butler to create:
A card button that automatically injects a bug report template into the card’s description and adds the “Bug”-label:
set the card's description to [**Summary**\n\n...]
[add] the [red "Bug"] label to the card
Or a card button that automatically creates a checklist named “Acceptance criteria” in the current card:
add an empty checklist named [Acceptance criteria] to the card